 |
|
|
 |
|
|
|
|
|
|
|
|
|
|
|
|
|
|
|
|
 |
 |


Tech Tips to be updated soon as of Aug 2002
TIP #1 TIP #2 TIP #3 TIP #4 TIP #5
TIP #1 - ![]()
After I fire my spyder I have to push the trigger forward to make the trigger re-engage.
In some cases this is caused when the sear latch (the lever that catches your lower bolt/striker) wears a notch in the pin that it rides on. Note: Not the pin that holds the sear latch in place but the one below it and more towards the front of the gun. This pin holds nothing in place and first glance would appear to serve no function at all. The material that the pin is made of is softer than the sear latch material thus it becomes worn from the sear latch running back and forth across the top of it. A quick fix is to remove the pin and turn it 180 degrees to push the sear latch up more to engage the back of the trigger correctly. A permanent fix is to go to local hardware store and get a “roll pin” the same diameter (roll pins are made of rolled tempered steel and are not as apt to wear). |
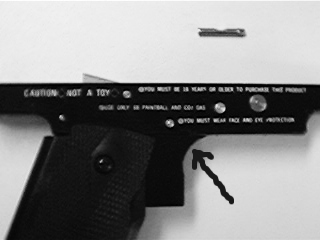 Arrow points towards the pin that may need replacing. The pin above is one that is worn. |
TIP #2 - ![]()
I replaced the pin as you said in the previous tip but I still have the same problem.
| There is a possibility this problem started occurring when a double finger trigger was installed or an after market trigger “kit” was installed. There is a tolerance variation (in layman – not all guns are exactly the same some have cast aluminum trigger frames, some plastic etc…) as to how much forward travel the trigger has before it makes contact with the main body of the gun. What must be done sometimes is to give the trigger more forward travel you must grind/file some of the material off the top of the tang of the trigger where it makes contact with the main body. Usually it does not require removing much at all, only about 1/64th to 1/32nd of an inch or so. | 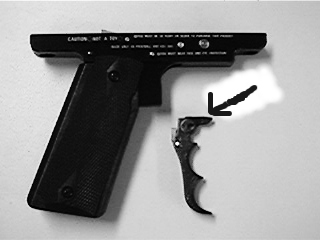 Arrow denotes the “tang” area mentioned in the tip. |
TIP #3 - ![]()
I have replaced the power tube o-ring and spacer several times but it still leaks down the barrel.
| There is at the base of the power tube an area that is thinner than the rest of the power tube. It is not as prevalent on newer guns but from time to time what can happen is it can develop a crack. This is a stress fracture and you should not attempt a “fix”. The only cure is to send it back to the factory and have them completely replace the power tube assembly. Be sure to call Airgun Designs before sending it in as they have a return authorization system. It should also be noted that the crack is not detectable by the naked eye. It will require a magnifying glass or loupe and the area to inspect is below the bolt bumper (the big flat blue grommet) just as the metal makes its turn. | 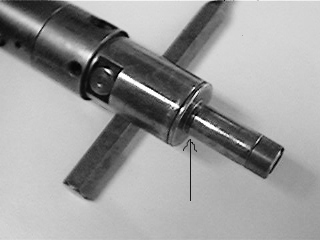 Note that the bumper has been removed and the arrow points to area in question. |
TIP #4 - ![]()
When I brake a ball in my angel the gun stops working.
| Due to extremely tight tolerances when an Angel breaks a ball it usually causes the bolt to stick forward, getting some of the paint/shell caught between the bolt and the breech area. The easiest suggestion is to carry a “stick” squeegee of some kind i.e. a t-handle, rag-end, battle-swab etc… Use the squeegee like a ramrod and poke the bolt back into place when this occurs. I might take this opportunity suggest that the factory and/or an after market company try making a “fluted” bolt or flute the breech area much the way some firearms companies do theirs. This is done so that if the weapon becomes packed with mud, ice, powder residue etc… it will still chamber a round by pushed the crap into the “flutes”. I don’t know this to be a complete fix or not but logically it should help. |  A good stiff squeegee is a must for angel owners. |
TIP #5 - ![]()
My autococker doesn’t cock when I try to “rapid fire”.
| Just like most everything on a cocker this could be caused by numerous things, but here are a couple to look for. It could be that your pump rod arm (the rod that runs completely down the outside of the main body connecting the “ram” to the “cocking block”) is either bent or twisted the wrong way. A way to check for this is to slide the cocking block back and forth to see if the rod is dragging and/or the block is difficult to move (do this with no air to the gun mind you). Fixing it may simply be a matter of twisting it the correct way (the “jut” in the rod should go towards the gun), or may require you to re-bend the rod itself or the rod run up inside the ram to offer better clearance of the main body. Another possibility is that you have blown a seal inside the “ram”. The way I check for this is to remove the two hoses from each end, pull the cocking block back and cover both ports on the ram tightly with your forefinger and thumb. While covering these ports tightly push the cocking block forward. You should feel resistance and when let go the block should “spring back”, if not then you know to replace/rebuild the ram. | 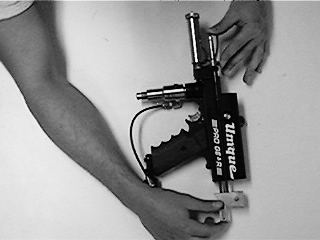 Photo demonstrates a good way to check your ram. |
Erik Hoffman is not to be held responsible for any injury or equipment damage. Our recommendation is that all paintball equipment repair or modification should be handled by a competent and qualified air smith or by the manufacturer of said product. Anybody using these tips should take great care doing anything to and/or operating any paintball equipment.